Maybe your house is too loud for you to hear the front door bell. Maybe it’s too big. Maybe you wanted a fun way to get acquainted with Telesign’s SMS API – P.S., learn how to send SMS to customers here. Any which way, we’ve got you covered with today’s project, an SMS doorbell. Rig a Raspberry Pi so that whenever someone presses a button, you get a text message telling you they’re at the front door. Not sure what a Raspberry Pi is? Don’t worry, we’ve included a 101 section for beginners.
Requirements:
- Telesign credentials – Your API key and customer ID with Telesign. If you don’t have these, you can sign up for them at https://portal.telesign.com. Follow the instructions provided and grab your API key and customer ID from the dashboard.
- Phone number – You need a phone number to receive SMS messages at. If you’re using Telesign’s free trial, you can only use the phone number you register with. Upgrade your account to use other phone numbers.
- Raspberry Pi 2 Starter Kit – Click the link to get the kit. If you have your own kit, you need the basic set up. If you have a different Pi, you may need to adjust the way you set up the connection between the pins and the breadboard.
- USB Mouse and Keyboard – the Pi works with most basic mice and keyboards.
- Breadboard – get the kind you don’t need to solder for. This project does not require any soldering.
- Push button – the kind of push button you want looks like this little picture here. It has four prongs. It’s really only two inside, but it looks like four from the outside. You can probably use different kinds of buttons, but this one is easy to wire and work with, so we recommend this one.

- Cute, isn’t it?
- 2 jumper cables each with one male and one female end.
Raspberry Pi 101
A Raspberry Pi is a small computer that’s cheap and plugs into a computer monitor or TV. Though if you do plan to use the TV screen you should make sure it’s not movie night at your place. Not everyone will find code compilation as riveting as you do. This small computer lets you easily explore computing and programming in languages like Python. You can also do basic things like surf the web, write text files, and other basics.
Raspberry Pi Configuration
If you already have your own Raspberry Pi, you probably won’t need to configure it. If you bought one just for this project, we do recommend the starter kit listed since it comes with everything you’d want to get started and maybe even a little extra. The kit includes cables, a power source, and a WiFi adapter that makes your Pi more portable. You can always plug the Pi directly into your router for internet access, but lots of people keep their routers tucked away and you may not want to sit in the closet with a bunch of shoes just to work on this project. We’ll leave it up to you.
Your kit should include instructions for configuring the Pi, but if you find those lacking, here is a great online tutorial that helps you get your Pi ready for this project: http://dailylinuxuser.com/2015/03/setting-up-raspberry-pi-2.html
You will also want to be able to use pip. If your Raspberry Pi does not have it installed by default, you can use the command:sudo apt-get install python-pipat the command line to get the Python 2 version of pip installed. There’s more details about what’s available here: https://www.raspberrypi.com/documentation/computers/os.html
When you are done, you will be able to:
- Access the Internet
- Use Python from a terminal window
- Use pip
Write the Code
The code for this project is fairly simple. You may need to download some of the libraries listed. rpi-gpio, HTTPBasicAuth, and requests are three you may need to add.To add these libraries, open a terminal window and at the command line use:
sudo pip install python-rpi.gpio
sudo pip install HTTPBasicAuth
sudo pip install requests
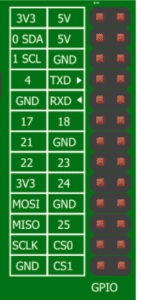
The rpi.gpio library lets your Pi register when you press a button (provided you wire it correctly), play sounds, and other things involving the two rows of pins on your Pi. Here’s an up close diagram of the two rows of GPIO pins on your Pi.
If you were playing around with your Pi and plugged in any kind of circuits, it’s recommended that you remove all of those, particularly while installing the modules we mentioned. Sometimes power can bleed out into your circuit in unexpected ways and cook parts of your Pi.After you install the modules, open a text file and paste in this code, which is a slight modification on the code sample here – http://razzpisampler.oreilly.com/ch07.html:import RPi.GPIO as GPIO
import time
from requests.auth import HTTPBasicAuth
import requests
GPIO.setmode(GPIO.BCM)
GPIO.setup(18, GPIO.IN, pull_up_down=GPIO.PUD_UP)
url = ‘https://rest-ww.telesign.com/v1/messaging’
headers = {‘Accept’ : ‘application/json’, ‘Content-Type’ : ‘application/x-www-form-urlencoded’}
data = {‘phone_number’: ‘Your phone number goes here.’, Ômessage_type’:’ARN’, Ômessage’: ‘Someone is at the door.’}
while True:
input_state = GPIO.input(18)
if input_state == False:
r = requests.post(url, auth=HTTPBasicAuth(ÔYour customer ID goes here’, ‘Your API key goes here’), data=data, headers=headers)
print(‘Button Pressed’)
time.sleep(0.2)
GPIO.setup(buttonPin, GPIO.IN, pull_up_down=GPIO.PUD_UP)
- Replace the phone_number parameter’s value with your entire phone number you want to receive the text message at, including the country code. Do not add any special characters or spaces.
- Replace ÔYour customer ID goes here‘ with your customer ID.
- Replace ÔYour API key goes here‘ with your API key.
- Eventually, you might want to take out the ÔButton Pressed’ print statement, but it can be useful to determine if the problem with your wiring is the wiring or something with your Telesign code. Right now, the code is set up so that when you press the button, you get a message on the Raspberry Pi in the terminal window that says ÔButton Pressed’ and an SMS on your phone.
Save your code file as sms_doorbell.py.
Set Up the Circuit
Now we set up the circuit on the breadboard.
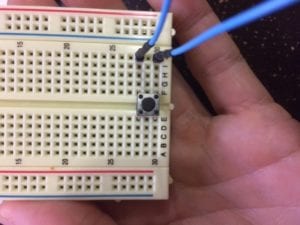
1. Take the push button, and position it over the big groove down the middle of your breadboard. Arrange it so that two prongs go in on one side of the groove, and two go in on the other side.
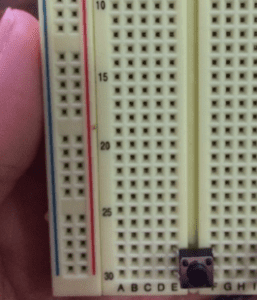
2. Take your jumper cables and push the male ends into the board so that one jumper cable is aligned in the same row as one prong from the push button. You only want to do this on one side of the groove. The end result looks like this:
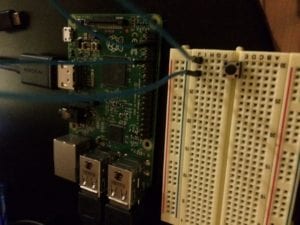
3. Orient your Raspberry pi so it is flush alongside the breadboard. It should be set up so you see two rows of GPIO pins, then the horizontal red line of your breadboard, then the horizontal blue line.
4. Connect the female end of the jumper cable in row 30 on the breadboard (see the number 30 by the jumper cable in the photo above) to the 3rdpin on the Pi (called GND) if you count from the top corner of the Pi. Connect the female end of the jumper cable in the other row (row 28 on the breadboard) to the 6thpin on the Pi if you count from the top corner. This is called pin 18.
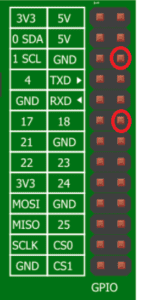
Here is a diagram labeling the pins and showing the two pins circled:
Run the Code
Now all you need to do is run the code. Open the terminal window and run your program with the command:python sms_doorbell.pyIf you saved your file somewhere else, navigate to the directory you have it in, and then run it.After the code is running, press the button on the breadboard. You should get a note on the terminal window that says ‘Button Pressed’ and a text message telling you someone is at the door!
Your SMS doorbell prototype is complete! We will leave it up to you to decide if you want to set it up on your front porch.”